Vimメモ : fzf(fuzzy finder)と連携するfzf.vimの使い方
fzf.vim
上記記事でfzfの使い方を調べてみたが、同じ作者がfzfとVimを連携するプラグインを書いているので使い方を調べてみる。
インストール
vim-plug(これも同じ作者が作っている)を使ったインストール方法は下記。 fzfが本体、fzf.vimがVimプラグインでVimは7.4以上が必要とのこと。
Plug 'junegunn/fzf', { 'dir': '~/.fzf', 'do': './install --all' }
Plug 'junegunn/fzf.vim'
コマンド一覧
インストールが成功していればVimで下記コマンドが使えるようになっている。
| Command | List |
|---|---|
| Files [PATH] | Files (similar to :FZF) |
| GFiles [OPTS] | Git files (git ls-files) |
| GFiles? | Git files (git status) |
| Buffers | Open buffers |
| Colors | Color schemes |
| Ag [PATTERN] | ag search result (ALT-A to select all, ALT-D to deselect all) |
| Lines [QUERY] | Lines in loaded buffers |
| BLines [QUERY] | Lines in the current buffer |
| Tags [QUERY] | Tags in the project (ctags -R) |
| BTags [QUERY] | Tags in the current buffer |
| Marks | Marks |
| Windows | Windows |
| Locate PATTERN | locate command output |
| History | v:oldfiles and open buffers |
| History: | Command history |
| History/ | Search history |
| Snippets | Snippets (UltiSnips) |
| Commits | Git commits (requires fugitive.vim) |
| BCommits | Git commits for the current buffer |
| Commands | Commands |
| Maps | Normal mode mappings |
| Helptags | Help tags |
| Filetypes | File types |
いくつかコマンドを試してみる。
Files
カレントディレクトリ以下のファイル一覧。選択するとそのファイルを表示する。

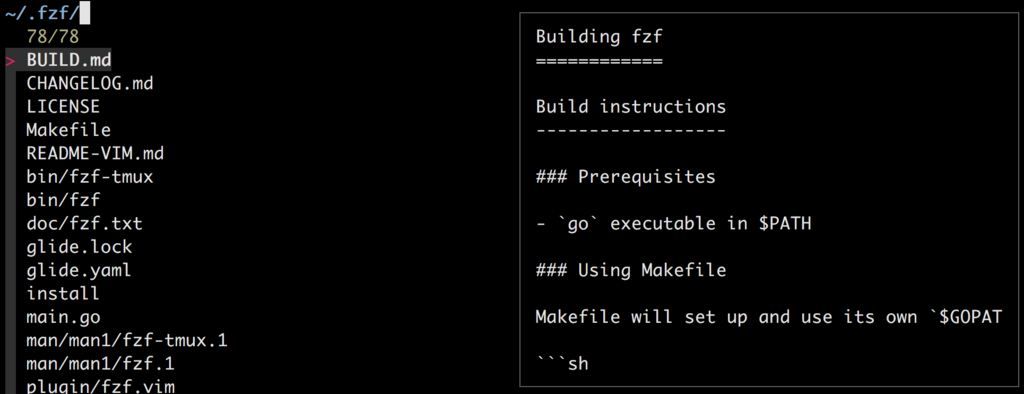
GFiles?
git statusのファイル一覧。横にプレビューが表示される。

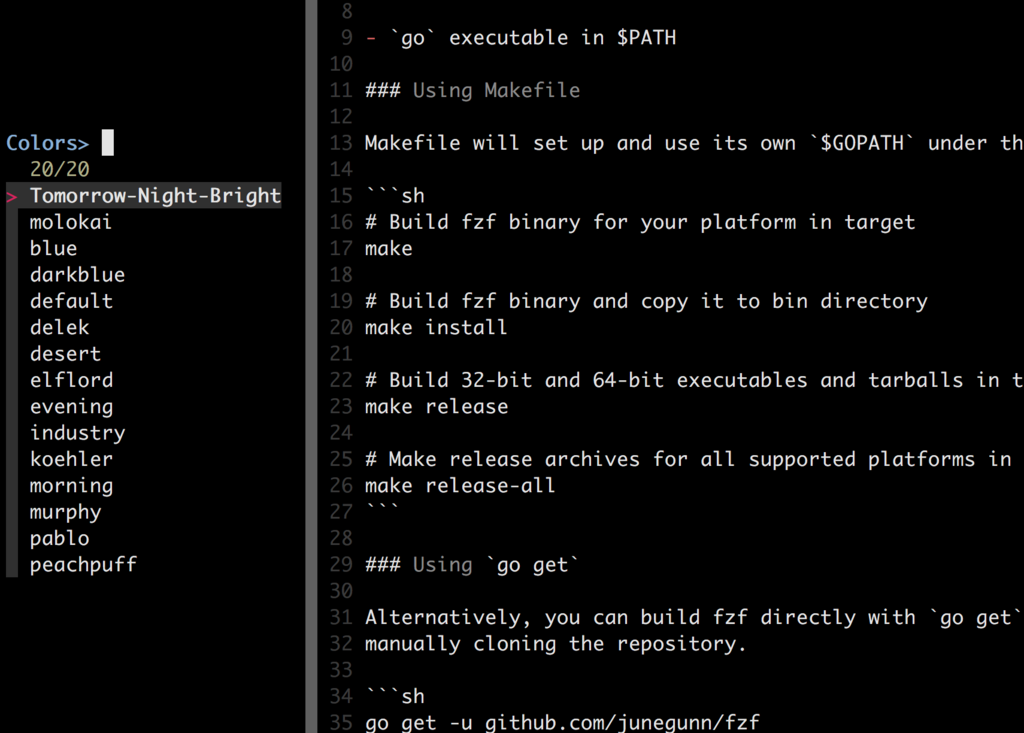
Colors
カラースキーム一覧。選択すると変更できる。

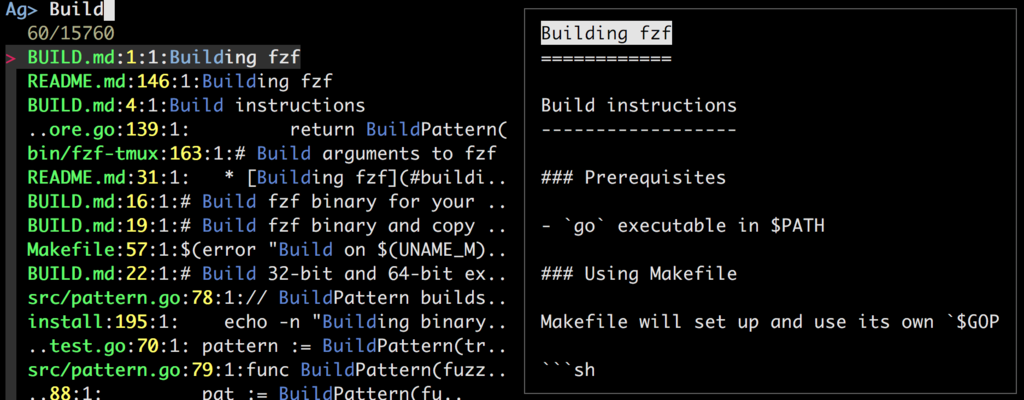
Ag [PATTERN]
Agの検索結果。

Commands
コマンド一覧。

Maps
ノーマルモードマッピング一覧。選択すると割り当てられている操作を実行する。

コマンド操作
ほとんどのコマンドでは絞り込み画面で下記キーバインドが使用可能になっている。
Ctrl-t: 新規タブで表示Ctrl-x: 水平分割して表示Ctrl-v: 垂直分割して表示
デフォルトでは画面下部に絞り込み画面を表示するがコマンド末尾に!をつけるとフルスクリーンモードで表示できる(例::Agの場合は:Ag!とする)。
また、以下のような設定を.vimrcに追加するとコマンドにプレフィックスを追加できる。下記例の場合は:Filesコマンドは:FzfFilesコマンドになる。
let g:fzf_command_prefix = 'Fzf'
カスタマイズ
グローバルオプション
デフォルトのキーバインド設定を変更する場合は下記を変更。
let g:fzf_action = {
  \ 'ctrl-t': 'tab split',
  \ 'ctrl-x': 'split',
  \ 'ctrl-v': 'vsplit' }
デフォルトでは絞り込み画面を下部に表示するようになっているので、画面上部に表示したい場合はupにする(サイズも変更可能)。
" - down / up / left / right
let g:fzf_layout = { 'down': '~40%' }
Neovimの場合は絞り込み画面を新規ウィンドウ、新規タブで表示できる。
" 新規ウィンドウ
let g:fzf_layout = { 'window': 'enew' }
" 新規タブ
let g:fzf_layout = { 'window': '-tabnew' }
色設定は下記設定で変更できる。
" Customize fzf colors to match your color scheme
let g:fzf_colors =
\ { 'fg':      ['fg', 'Normal'],
  \ 'bg':      ['bg', 'Normal'],
  \ 'hl':      ['fg', 'Comment'],
  \ 'fg+':     ['fg', 'CursorLine', 'CursorColumn', 'Normal'],
  \ 'bg+':     ['bg', 'CursorLine', 'CursorColumn'],
  \ 'hl+':     ['fg', 'Statement'],
  \ 'info':    ['fg', 'PreProc'],
  \ 'prompt':  ['fg', 'Conditional'],
  \ 'pointer': ['fg', 'Exception'],
  \ 'marker':  ['fg', 'Keyword'],
  \ 'spinner': ['fg', 'Label'],
  \ 'header':  ['fg', 'Comment'] }
コマンドローカルオプション
各コマンドに対する設定は以下のようにすればよいとのこと。
" [Buffers] Jump to the existing window if possible
let g:fzf_buffers_jump = 1

" [[B]Commits] Customize the options used by 'git log':
let g:fzf_commits_log_options = '--graph --color=always --format="%C(auto)%h%d %s %C(black)%C(bold)%cr"'

" [Tags] Command to generate tags file
let g:fzf_tags_command = 'ctags -R'

" [Commands] --expect expression for directly executing the command
let g:fzf_commands_expect = 'alt-enter,ctrl-x'
高度な設定
既存コマンドをオーバーライドする方法や独自のコマンドを定義する方法はREADMEに書いてある。
例えば下記コードを.vimrcに追加すると:Colorsコマンド実行時の絞り込み画面の表示が変わる。
command! -bang Colors
  \ call fzf#vim#colors({'left': '15%', 'options': '--reverse --margin 30%,0'}, <bang>0)

下記コードは:Filesコマンドでプレビュー表示する方法。
command! -bang -nargs=? -complete=dir Files
  \ call fzf#vim#files(<q-args>, fzf#vim#with_preview(), <bang>0)

:Agコマンド実行時に?を押すとプレビューが表示できる。
command! -bang -nargs=* Ag
  \ call fzf#vim#ag(<q-args>,
  \                 <bang>0 ? fzf#vim#with_preview('up:60%')
  \                         : fzf#vim#with_preview('right:50%:hidden', '?'),
  \                 <bang>0)

ripgrepを使いたい場合は下記コードで:Rgコマンドが使えるようになる。
command! -bang -nargs=* Rg
  \ call fzf#vim#grep(
  \   'rg --column --line-number --no-heading --color=always '.shellescape(<q-args>), 1,
  \   <bang>0 ? fzf#vim#with_preview('up:60%')
  \           : fzf#vim#with_preview('right:50%:hidden', '?'),
  \   <bang>0)
マッピング
| Mapping | Description |
|---|---|
| Normal mode mappings | |
| Insert mode mappings | |
| Visual mode mappings | |
| Operator-pending mappings | |
| cat /usr/share/dict/words | |
| Path completion using find (file + dir) | |
| File completion using find | |
| File completion using ag | |
| completion (all open buffers) | |
| Line completion (current buffer only) |
上記表を参考に、例えば下記コードを追加すると<Leader>Tabキーで:Mapsコマンドが呼び出せる。
" Mapping selecting mappings
nmap <leader><tab> <plug>(fzf-maps-n)
xmap <leader><tab> <plug>(fzf-maps-x)
omap <leader><tab> <plug>(fzf-maps-o)
挿入モードでファイル名や行を補完する例。Ctrl-xを押してからCtrl-lを押すと全てのバッファを対象に行を検索して補完ができる。
" Insert mode completion
imap <c-x><c-k> <plug>(fzf-complete-word)
imap <c-x><c-f> <plug>(fzf-complete-path)
imap <c-x><c-j> <plug>(fzf-complete-file-ag)
imap <c-x><c-l> <plug>(fzf-complete-line)
以下のような設定もできる。
" Advanced customization using autoload functions
inoremap <expr> <c-x><c-k> fzf#vim#complete#word({'left': '15%'})